
dearbeany
[Spring] SpringMVC 요청처리흐름 | 파일업로드와 다운로드 실습 본문
<File Upload>
Commons-fileupload 라이브러리 세팅
commonsFileUpload 객체를 꼭 multipartResolver 란 이름으로 빈등록
jsp 파일(사용자 ui) input type file로 파일 업로드할 수 있도록 ui 제공 (enctype=”multipart/form-data”)
파일 파라미터 키 값에 대응되도록 MultipartFile 을 수신
그 다음 파일 원하는 곳에 저장
<File Download>
resources 태그를 통해서 예외적으로 파일이 있는 자원 위치를 열어주든가
downloadView 응답을 구현
■ 파일 업로드
pom.xml로 들어가보면?
servlet-context.xml : 웹과 관련된 설정들, DispatcherServlet을 등록해서 쓰고 있다.
root-context.xml : 그 외의 기타 설정들
파일업로드를 위한 세팅을 먼저 해보자. pom.xml 에 라이브러리 추가
https://mvnrepository.com/artifact/commons-fileupload/commons-fileupload/1.4
// pom.xml
<!-- 파일 업로드 -->
<dependency>
	<groupId>commons-fileupload</groupId>
	<artifactId>commons-fileupload</artifactId>
	<version>1.4</version>
</dependency>
MainContoller 파일 생성
하기 전에... Spring MVC 요청처리 흐름을 파악해볼까?
- 클라이언트의 요청을 DispatcherServlet이 받음
- HandlerMapping에 의해 해당 요청을 어떤 Controller가 처리할지 결정
- Controller에 의해 요청 처리
- 결과를 보여줄 View와 data를 ModelAndView에 담아 반환
- ViewResolver에 의해 실제 결과를 보여줄 View를 결정하고 View에 ModelAndView를 반환
- DispatcherServlet은 View가 만들어낸 결과로 응답
* Spring MVC 요청 처리 흐름

(1) 클라이언트가 요청한다.
http://localhost:8080/mvc/
'mvc'는 컨텍스트 루트 '/' 이후로는 실제 요청
* 컨텍스트 루트: 서버에 프로젝트를 여러 개 올렸을 때 구분자역할
(2) 서버에게 요청이 날라가면 DispathcerServlet이 요청을 받아서 Hanlder에게 넘긴다.
(3) HandlerMapping이 받아서 어떤 Controller가 처리하면 좋을지 결정한다.
(4) MainController가 GET방식으로 들어온 요청을 받아서 요청에 해당하는 @GetMapping("/")된 메소드를 실행한다.
@Controller
public class MainController {
	@GetMapping("/")
	public String showIndex() {
		return "index";
	}
}
(5) MainController가 반환할 땐 ModelAndView의 형태로 돌려주지만, 메소드의 반환형태가 String이기에 리턴된 "index"를 viewname으로 사용한다. (viewname = index)
(6) ViewResolver(servlet-context.xml에 존재)가 동작을 하면서 가지고 있는 viewname에 접두사 접미사를 붙여서 경로를 완성하여 돌려준다.
<!-- servlet-context.xml -->
<beans:bean class="org.springframework.web.servlet.view.InternalResourceViewResolver">
	<beans:property name="prefix" value="/WEB-INF/views/" />
	<beans:property name="suffix" value=".jsp" />
</beans:bean>
<context:component-scan base-package="com.ssafy.mvc" />
→ 이를 통해 완성된 경로!
/WEB-INF/views/index.jsp
(7) 완성된 경로를 호출하여 페이지를 만든 후 클라이언트에게 결과를 반환한다.
(8) 결과적으로, 프로젝트를 실행하면 index.jsp 페이지가 등록한다!
그렇다면 지금부터 파일을 업로드해보자.
1. index.jsp 에 파일 입력폼을 만든 후 서버 전송하기
먼저 파일이라는 것은 입력을 받을 수 있어야 하고, 이 파일을 서버에 전송해주어야 한다.
<form action="" method=""> 태그를 사용하자!
<!-- index.jsp -->
	<h1>파일 업로드 하기 </h1>
	<form action="upload" method="post">
		<input type="file" />
		<input type="submit" />
	</form>
- 파일 전송 시 method는 POST방식을 사용해야 한다.
(GET은 url이 노출되며 용량제한. POST는 key-value형식으로 날아가면서 용량제한이 없다)

왜냐하면?
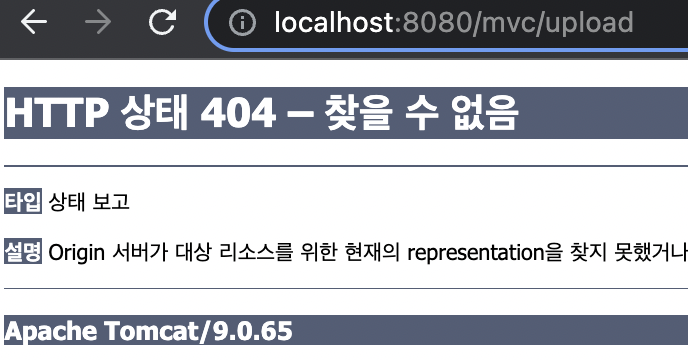
(1) html, jsp에 올린 데이터를 서버에서 어떻게 구분하나? name 속성을 지정해야한다.
(2) upload에 대한 컨트롤 맵핑을 해주지 않았음
	<h1>파일 업로드 하기 </h1>
	<form action="upload" method="post" enctype="multipart/form-data">
		<input type="file" name="upload_file"/>
		<input type="submit" />
	</form>
- 인코딩타입 && file에 대한 name 지정 필수!
2. MainController 에서 upload 액션 매핑
// MainController.java
	@PostMapping("upload")
	public String upload(MultipartFile upload_file) {
		System.out.println(upload_file);
		return "result";
	}
- upload에 대한 컨트롤러 매핑 완료!
- 파라미터명은 index.jsp에서 입력으로 받은 name명과 동일해야 한다. 다르게 할 경우 별도로 @RequestParam("upload_file") 해주어야 한다.
- viewname은 result로 반환했다. ViewResolver에서 경로완성해서 반환한다.
/WEB-INF/views/result.jsp
3. servlet-context.xml에서 MultipartResolver를 bean 세팅
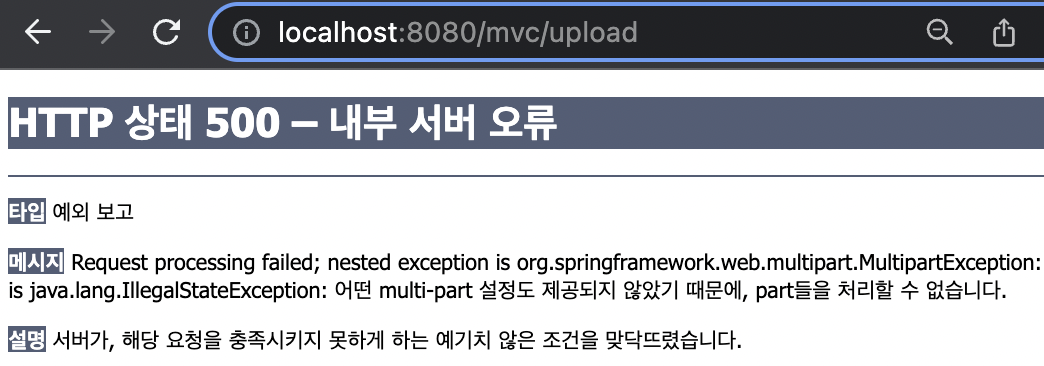
- 지금까지의 실행결과. multipart에 대한 설정이 필요하다.
- Commons-fileupload 라이브러리 세팅
<!-- pom./xml -->
		<!-- file upload 처리를 위해 추가한다. -->
		<!-- https://mvnrepository.com/artifact/commons-fileupload/commons-fileupload -->
		<dependency>
			<groupId>commons-fileupload</groupId>
			<artifactId>commons-fileupload</artifactId>
			<version>1.4</version>
		</dependency>
- commonsFileUpload 객체를 꼭 multipartResolver 란 이름으로 빈등록
- 즉, multipartResolver를 bean으로 등록해서 데이터로 넘어온 걸 쪼개서 사용하자
<!-- servlet-context.xml -->
<beans:bean id="multipartResolver" class="org.springframework.web.multipart.commons.CommonsMultipartResolver">
	<beans:property name="maxUploadSize" value="10485760" />
	<beans:property name="defaultEncoding" value="UTF-8" />
</beans:bean>
- 파일 크기 용량을 10MB로 제한해준다. (performance 향상을 위해)
4. MainController 에서 ModelAndView 반환하기
// MainController.java
	@Autowired
	private ServletContext servletContext;

	@GetMapping("/")
	public String showIndex() {
		return "index";
	}

	@PostMapping("upload")
	public String upload(MultipartFile upload_file, Model model) {
		String uploadPath = servletContext.getRealPath("/file");
		String fileName = upload_file.getOriginalFilename();
		File target = new File(uploadPath, fileName);

		// 만약 file이라고 하는 경로가 없다면 만들어주는 게 먼저
		if (!new File(uploadPath).exists()) {
			new File(uploadPath).mkdir();
		}

		// 파일을 카피를 떠서 저장한다. 데이터를 바이트배열로 만들어서 어디다 쓸 지 지정해준다
		try {
			FileCopyUtils.copy(upload_file.getBytes(), target);
		} catch (IOException e) {
			// TODO Auto-generated catch block
			e.printStackTrace();
		}

		model.addAttribute("fileName", fileName);
		return "result";
	}
- @Autowired → new 해서 쓰는 게 아니니까, 의존성 주입해서 쓴다는 의미 (있는 걸 가져다 쓰자!)
- 넘겨받은 파일(upload_file)을 가져다가 서버에 저장해보자.
- ModelAndView 형태가 아니므로, 데이터를 담는 바구니인 Model을 사용하여 결과창에 반환해주자.

- 그렇다면, 제출된 파일이 /file 경로에 잘 저장되어있는 걸 어디서 확인하면 될까?
- 톰캣(WAS)에서 확인해야한다! 우리 프로젝트는 톰캣에 올라가 있는 상태다.
- 파일을 업로드 한다 → 복사본을 톰캣 서버에 저장한다 → 서버로부터 파일을 불러온다
- 등록해논 파일을 서버로부터 가져와서 보는 방법은 없을까?
5. 업로드한 파일 확인하기
<!-- servlet-context.xml -->
<resources mapping="/file/**" location="/file/" />
<!-- result.jsp -->
<a href="/mvc/file/${fileName }">${fileName }</a>


- 결과적으로 파일을 업로드 하는 순간 서버에 저장된다.
- 지금부터는 파일을 다운로드 해보자!
■ 파일 다운로드
1. FileDownLoadView.java 생성
@Component
public class FileDownLoadView extends AbstractView {
	public FileDownLoadView() {
		setContentType("application/download; charset=UTF-8");
	}

	@Override
	protected void renderMergedOutputModel(Map<String, Object> model, HttpServletRequest request,
			HttpServletResponse response) throws Exception {
		ServletContext ctx = getServletContext();
		String realPath = ctx.getRealPath("/file");

		Map<String, Object> fileInfo = (Map<String, Object>) model.get("downloadFile"); // 전송받은 모델(파일 정보)

		String filename = (String) fileInfo.get("fileName"); // 파일 경로
		File file = new File(realPath, filename);

		response.setContentType(getContentType());
		response.setContentLength((int) file.length());

		String header = request.getHeader("User-Agent");
		boolean isIE = header.indexOf("MSIE") > -1 || header.indexOf("Trident") > -1;
		String fileName = null;
		// IE는 다르게 처리
		if (isIE) {
			fileName = URLEncoder.encode(filename, "UTF-8").replaceAll("\\+", "%20");
		} else {
			fileName = new String(filename.getBytes("UTF-8"), "ISO-8859-1");
		}
		response.setHeader("Content-Disposition", "attachment; filename=\"" + fileName + "\";");
		response.setHeader("Content-Transfer-Encoding", "binary");
		OutputStream out = response.getOutputStream();
		FileInputStream fis = null;
		try {
			fis = new FileInputStream(file);
			FileCopyUtils.copy(fis, out);
		} catch (Exception e) {
			e.printStackTrace();
		} finally {
			if (fis != null) {
				try {
					fis.close();
				} catch (IOException e) {
					e.printStackTrace();
				}
			}
		}
		out.flush();
	}
}
2. servlet-context.xml 에서 bean 등록
<!-- servlet-context.java -->
<beans:bean class="org.springframework.web.servlet.view.BeanNameViewResolver">
	<beans:property name="order" value="0"></beans:property>
</beans:bean>
- 생성 후에 servlet-context.xml에서 bean으로 등록해준다. (이전에 context:component-scan 으로 미리 등록돼있음)
	<!-- Handles HTTP GET requests for /resources/** by efficiently serving up static resources in the ${webappRoot}/resources directory -->
	<resources mapping="/resources/**" location="/resources/" />
	<resources mapping="/file/**" location="/file/" />
- 사용자가 resources 폴더에 접근할 수 있도록 file폴더 등록해서 열어준다.
3. result.jsp
<a href="download?fileName=${fileName }">${fileName }</a>- 링크 클릭 시 download라는 요청을 날리는데, 이 때 쿼리스트링으로 fileName이 파일의 이름으로 담겨서 날아간다.
4. download 요청 컨트롤러에서 매핑
// MainController.java
	@GetMapping("download")
	public String download(Model model, String fileName) {
		Map<String, Object> fileInfo = new HashMap<>();
		fileInfo.put("fileName", fileName);
		model.addAttribute("downloadFile", fileInfo);

		return "fileDownLoadView";
	}
- a태그로 오는 것은 GET방식. fileName으로 요청이 넘어왔다.
- fileDownLoadView로 보내는데, FileDownloadView를 bean으로 등록 후 별도의 id를 설정해주지 않았으므로 알아서 맨 앞글자를 소문자로 바꾼 게 bean이름이 된다.
- downloadFile이라는 객체를 생성해서 리턴하는 곳에 보내준다.
4. 파일 다운로드 해보기

'Spring' 카테고리의 다른 글
| [Tomcat] starting tomcat v9.0 server at localhost has encountered a problem in mac (0) | 2022.10.20 |
|---|---|
| [MyBatis] MyBatis와 Java 초기세팅 (Mapper, typeAlias, $과 #의 차이) (0) | 2022.10.20 |
| [AOP] 프록시패턴 (0) | 2022.10.13 |
| [Spring] Spring DI 종합실습1~3. JDBC 를 Spring 프로젝트로 바꾸기 | AOP (0) | 2022.10.12 |
| [Spring] 의존성주입(DI)와 제어역행(IoC) (0) | 2022.10.11 |


